Replacing Your HVAC Contactor: A Comprehensive Guide
Homeowner Tips & News
![]()
Family Owned & Operated
![]()
Trusted & Highly Rated Service
![]()
Responsive & Timely Service
![]()
Family Owned & Operated
![]()
Trusted & Highly Rated Service
![]()
Responsive & Timely Service
Replacing Your HVAC Contactor: A Comprehensive Guide
Introduction
Replacing Your HVAC Contactor: A Comprehensive Guide: Today, we delve into the world of HVAC contactors, exploring common problems, diagnosis techniques, and the crucial process of replacement. Gain insights into maintaining your unit’s efficiency and reliability.
Understanding HVAC Contactors
When examining your HVAC system, focus on the contactor, a critical component responsible for facilitating electrical flow. Identifying common issues is essential for ensuring your unit operates seamlessly.
Common Problems:
- Pitting on Contact Points:
- Frequent failure point causing a lack of electrical contact.
- Diagnose by checking for visible damage or using a voltmeter during unit operation.
- Ant Infestation:
- Ants may accumulate around contact points.
- Regular inspection and ant prevention are crucial.
- 24-Volt Coil Issues:
- The coil controls the contactor’s operation.
- Check for 24 volts between coil points; absence may indicate a coil problem.
Diagnosing Contactors
Ensure safety when diagnosing contactors, considering live power. Use a voltmeter to measure voltage drop between points during unit operation. Verify the coil’s functionality by checking for 24 volts.
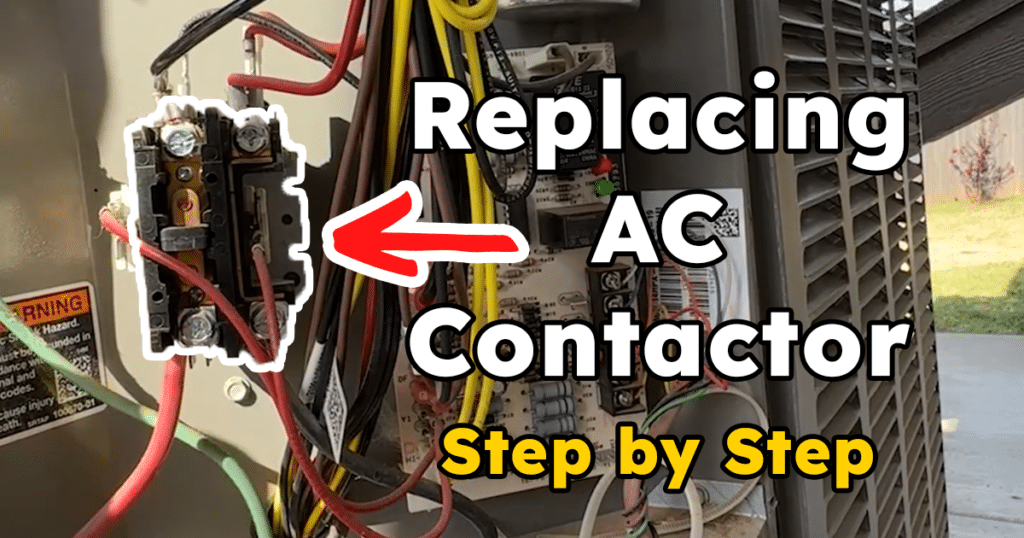
Replacing HVAC Contactors
Contemplating replacement? Follow these steps for a smooth transition:
- Disconnect Power:
- Prioritize safety; disconnect power to the unit.
- Remove Old Contactor:
- Unfasten screws securing the old contactor.
- Carefully pull out the contactor, keeping track of wire connections.
- Prepare New Contactor:
- Align the new contactor with the screw holes.
- Insert screws and tighten.
- Wire Replacement:
- Transfer wires from the old to the new contactor.
- Ensure a snug fit to prevent disconnection.
- 24-Volt Wires:
- Carefully manipulate loose wires for a better connection.
- Pinch to enhance the grip.
- Final Checks:
- Confirm all wires are correctly connected.
- Refer to the wiring diagram for accuracy.
- Cover Installation:
- Some contactors feature protective covers.
- Invest in an ant-proof switch for prolonged durability.
Conclusion
While replacing contactors seems straightforward, understanding the intricacies of your HVAC system enhances the process. A malfunctioning contactor can disrupt your unit’s operation, but with proper diagnosis and replacement, you ensure optimal performance.
Don’t let a faulty contactor be the Achilles’ heel of your HVAC system. Regular maintenance and professional inspections contribute to the longevity of your unit, ensuring a comfortable indoor environment.
Note: For comprehensive system evaluations, always consult HVAC professionals to address potential underlying issues.